Introduction
fbchat uses your email and password to communicate with the Facebook server.
That means that you should always store your password in a separate file, in case e.g. someone looks over your shoulder while you’re writing code.
You should also make sure that the file’s access control is appropriately restrictive
Logging In
Simply create an instance of Client. If you have two factor authentication enabled, type the code in the terminal prompt
(If you want to supply the code in another fashion, overwrite Client.on2FACode):
from fbchat import Client
from fbchat.models import *
client = Client('<email>', '<password>')
Replace <email> and <password> with your email and password respectively
Note
For ease of use then most of the code snippets in this document will assume you’ve already completed the login process
Though the second line, from fbchat.models import *, is not strictly necessary here, later code snippets will assume you’ve done this
If you want to change how verbose fbchat is, change the logging level (in Client)
Throughout your code, if you want to check whether you are still logged in, use Client.isLoggedIn.
An example would be to login again if you’ve been logged out, using Client.login:
if not client.isLoggedIn():
    client.login('<email>', '<password>')
When you’re done using the client, and want to securely logout, use Client.logout:
client.logout()
Threads
A thread can refer to two things: A Messenger group chat or a single Facebook user
ThreadType is an enumerator with two values: USER and GROUP.
These will specify whether the thread is a single user chat or a group chat.
This is required for many of fbchat’s functions, since Facebook differentiates between these two internally
Searching for group chats and finding their ID can be done via. Client.searchForGroups,
and searching for users is possible via. Client.searchForUsers. See Fetching Information
You can get your own user ID by using Client.uid
Getting the ID of a group chat is fairly trivial otherwise, since you only need to navigate to https://www.facebook.com/messages/,
click on the group you want to find the ID of, and then read the id from the address bar.
The URL will look something like this: https://www.facebook.com/messages/t/1234567890, where 1234567890 would be the ID of the group.
An image to illustrate this is shown below:
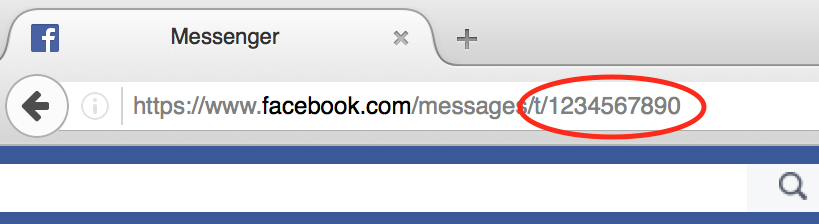
The same method can be applied to some user accounts, though if they’ve set a custom URL, then you’ll just see that URL instead
Here’s an snippet showing the usage of thread IDs and thread types, where <user id> and <group id>
corresponds to the ID of a single user, and the ID of a group respectively:
client.send(Message(text='<message>'), thread_id='<user id>', thread_type=ThreadType.USER)
client.send(Message(text='<message>'), thread_id='<group id>', thread_type=ThreadType.GROUP)
Some functions (e.g. Client.changeThreadColor) don’t require a thread type, so in these cases you just provide the thread ID:
client.changeThreadColor(ThreadColor.BILOBA_FLOWER, thread_id='<user id>')
client.changeThreadColor(ThreadColor.MESSENGER_BLUE, thread_id='<group id>')
Message IDs
Every message you send on Facebook has a unique ID, and every action you do in a thread, like changing a nickname or adding a person, has a unique ID too.
Some of fbchat’s functions require these ID’s, like Client.reactToMessage,
and some of then provide this ID, like Client.sendMessage.
This snippet shows how to send a message, and then use the returned ID to react to that message with a 😍 emoji:
message_id = client.send(Message(text='message'), thread_id=thread_id, thread_type=thread_type)
client.reactToMessage(message_id, MessageReaction.LOVE)
Interacting with Threads
fbchat provides multiple functions for interacting with threads
Most functionality works on all threads, though some things, like adding users to and removing users from a group chat, logically only works on group chats
The simplest way of using fbchat is to send a message.
The following snippet will, as you’ve probably already figured out, send the message test message to your account:
message_id = client.send(Message(text='test message'), thread_id=client.uid, thread_type=ThreadType.USER)
You can see a full example showing all the possible thread interactions with fbchat by going to Examples
Fetching Information
You can use fbchat to fetch basic information like user names, profile pictures, thread names and user IDs
You can retrieve a user’s ID with Client.searchForUsers.
The following snippet will search for users by their name, take the first (and most likely) user, and then get their user ID from the result:
users = client.searchForUsers('<name of user>')
user = users[0]
print("User's ID: {}".format(user.uid))
print("User's name: {}".format(user.name))
print("User's profile picture URL: {}".format(user.photo))
print("User's main URL: {}".format(user.url))
Since this uses Facebook’s search functions, you don’t have to specify the whole name, first names will usually be enough
You can see a full example showing all the possible ways to fetch information with fbchat by going to Examples
Sessions
fbchat provides functions to retrieve and set the session cookies.
This will enable you to store the session cookies in a separate file, so that you don’t have to login each time you start your script.
Use Client.getSession to retrieve the cookies:
session_cookies = client.getSession()
Then you can use Client.setSession:
client.setSession(session_cookies)
Or you can set the session_cookies on your initial login.
(If the session cookies are invalid, your email and password will be used to login instead):
client = Client('<email>', '<password>', session_cookies=session_cookies)
Warning
You session cookies can be just as valuable as you password, so store them with equal care
Listening & Events
To use the listening functions fbchat offers (like Client.listen),
you have to define what should be executed when certain events happen.
By default, (most) events will just be a logging.info statement,
meaning it will simply print information to the console when an event happens
Note
You can identify the event methods by their on prefix, e.g. onMessage
The event actions can be changed by subclassing the Client, and then overwriting the event methods:
class CustomClient(Client):
    def onMessage(self, mid, author_id, message_object, thread_id, thread_type, ts, metadata, msg, **kwargs):
        # Do something with message_object here
        pass

client = CustomClient('<email>', '<password>')
Notice: The following snippet is as equally valid as the previous one:
class CustomClient(Client):
    def onMessage(self, message_object, author_id, thread_id, thread_type, **kwargs):
        # Do something with message_object here
        pass

client = CustomClient('<email>', '<password>')
The change was in the parameters that our onMessage method took: message_object and author_id got swapped,
and mid, ts, metadata and msg got removed, but the function still works, since we included **kwargs
Note
Therefore, for both backwards and forwards compatibility,
the API actually requires that you include **kwargs as your final argument.
View the Examples to see some more examples illustrating the event system
